How to Install WordPress on Namecheap Hosting : Setting up a website is one of the most crucial steps in establishing an online presence, whether for personal branding, blogging, eCommerce, or business. One of the best ways to build a website quickly is by using WordPress, the world’s most popular Content Management System (CMS). However, choosing the right hosting provider plays a vital role in ensuring a smooth, fast, and secure website experience.
Namecheap is one of the most affordable and reliable hosting providers available in 2025. Known for its high-speed servers, 99.99% uptime guarantee, strong security features, and easy-to-use dashboard, Namecheap makes it easy for beginners and experts alike to install WordPress in just a few clicks. Whether you are launching a blog, business site, or eCommerce store, this guide will walk you through how to install WordPress on Namecheap hosting step by step.
By the end of this guide, you will have a fully functional WordPress website running on Namecheap, ready for customization. Let’s get started!
Step 1: Purchase a Hosting Plan from Namecheap
Before installing WordPress, you must have a hosting account with Namecheap. If you don’t already have one, follow these steps:
- Go to Namecheap’s Website: Visit Namecheap’s official website and navigate to the Hosting section.
- Choose a Hosting Plan: Select a plan that fits your needs. Namecheap offers:
- Shared Hosting – Best for small websites and blogs.
- Managed WordPress Hosting (EasyWP) – Optimized for WordPress performance.
- VPS Hosting – For higher control and scalability.
- Dedicated Servers – For large-scale businesses.
- Click “Get Started” and follow the checkout process.
- Register a Domain Name or use an existing domain. If you don’t have a domain yet, Namecheap allows you to buy one during the checkout.
- Complete Payment using a credit card, PayPal, or cryptocurrency.
Once your hosting plan is active, you will receive an email with login details for cPanel or EasyWP, depending on your selected plan.
Step 2: Access Your Namecheap cPanel
To install WordPress, you need to log in to your hosting account’s cPanel.
- Go to Namecheap’s Website and log in to your account dashboard.
- Navigate to “Hosting List” and select the hosting plan where you want to install WordPress.
- Click on “Go to cPanel”, which will take you to the cPanel dashboard without needing extra login credentials.
Step 3: Install WordPress Using Softaculous
Namecheap provides a simple one-click WordPress installation through Softaculous, an auto-installer available in cPanel.
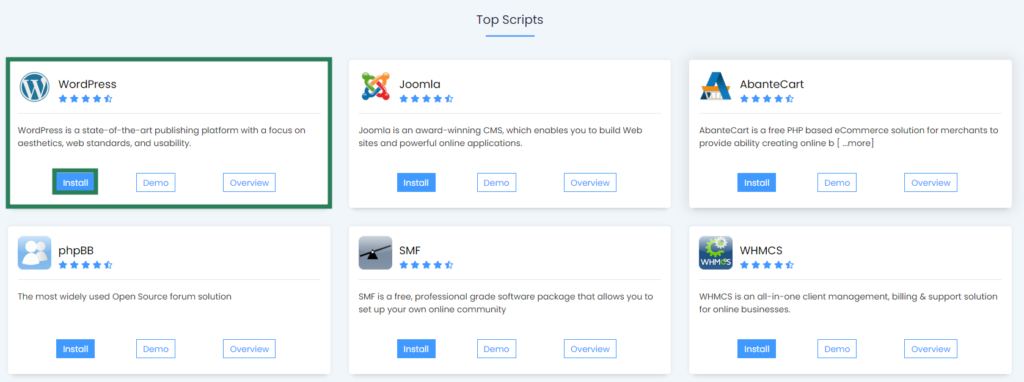
- In cPanel, locate “Softaculous Apps Installer” under the Software section.
- Click on “WordPress” from the list of available applications.
- Click “Install Now” to start the setup process.
Configuration Details for WordPress Installation
- Choose the Version: Select the latest version of WordPress.
- Choose Installation URL: Select your domain (e.g.,
https://yourdomain.com). - Site Name & Description: Enter your website name and a short description.
- Admin Username & Password: Create a secure login for your WordPress dashboard.
- Admin Email: Provide an active email to receive website updates.
- Choose Theme (Optional): You can select a pre-installed theme or leave it as default.
Once all details are filled in, click “Install” and wait a few minutes for WordPress to be installed.
Step 4: Login to Your WordPress Dashboard
After installation, you will see a success message with your WordPress login URL.
- Go to:
https://yourdomain.com/wp-admin/ - Enter Admin Username & Password (set during installation).
- Click “Log In” to access your WordPress dashboard.
Step 5: Configure Basic WordPress Settings
Now that WordPress is installed, it’s time to configure essential settings for better performance and security.
1. Set Permalinks for SEO-Friendly URLs
- Go to Settings > Permalinks and select “Post name” to make URLs user-friendly (
https://yourdomain.com/sample-post/).
2. Install a WordPress Theme
- Go to Appearance > Themes > Add New and browse free or premium themes to customize your website design.
3. Install Essential Plugins
To improve functionality, install the following plugins:
- Yoast SEO – For search engine optimization.
- WPForms – For adding contact forms.
- Elementor – Drag-and-drop page builder.
- W3 Total Cache – To improve website speed.
Step 6: Secure Your WordPress Website
To protect your site from security threats, follow these steps:
- Enable SSL Certificate
- Namecheap provides a free SSL certificate for secure HTTPS access.
- Go to cPanel > SSL/TLS and install an SSL certificate.
- Install a Security Plugin
- Use Wordfence Security or Sucuri Security to prevent malware attacks.
- Regular Backups
- Install UpdraftPlus to schedule automatic backups of your website.
Step 7: Optimize for Speed and Performance
To make your site load faster, apply these optimizations:
- Enable Caching – Use WP Rocket or W3 Total Cache.
- Optimize Images – Install Smush or Imagify to reduce image file sizes.
- Use a Content Delivery Network (CDN) – Namecheap provides free CDN integration for faster page loading worldwide.
Step 8: Start Creating Content
Now that your WordPress site is ready, you can start publishing content.
- Go to Posts > Add New to write your first blog post.
- Use Categories & Tags to organize your content.
- Add high-quality images and SEO-friendly keywords to improve search rankings.
How to Install WordPress on Namecheap Hosting in 2025 Video Tutorial
Conclusion: Why Namecheap is the Best Choice for WordPress Hosting in 2025
Installing WordPress on Namecheap hosting is easy, fast, and beginner-friendly. With high-performance servers, 24/7 support, free SSL, and automatic WordPress updates, Namecheap ensures your website runs smoothly and securely.
If you are looking for a reliable, budget-friendly hosting provider with seamless WordPress integration, Namecheap is the perfect choice. Follow this guide step by step, and you’ll have your WordPress website up and running in no time!
Now, it’s time to customize your site and grow your online presence. Good luck! 🚀